The challenge: a legal deadline and tools that didn’t exist yet
Canva Print had always been white-label: customers placed an order, Canva routed it to a printer, and nobody knew who made it. Becoming a marketplace, where customers choose their printer, meant passing a legal test called Agent Status, which decides whether Canva acts as a marketplace or a principal, with an MVP target of 30 June 2026. Sellers and Print Operations needed tools that didn’t exist yet, and the seller portal was what made the model legally legitimate.
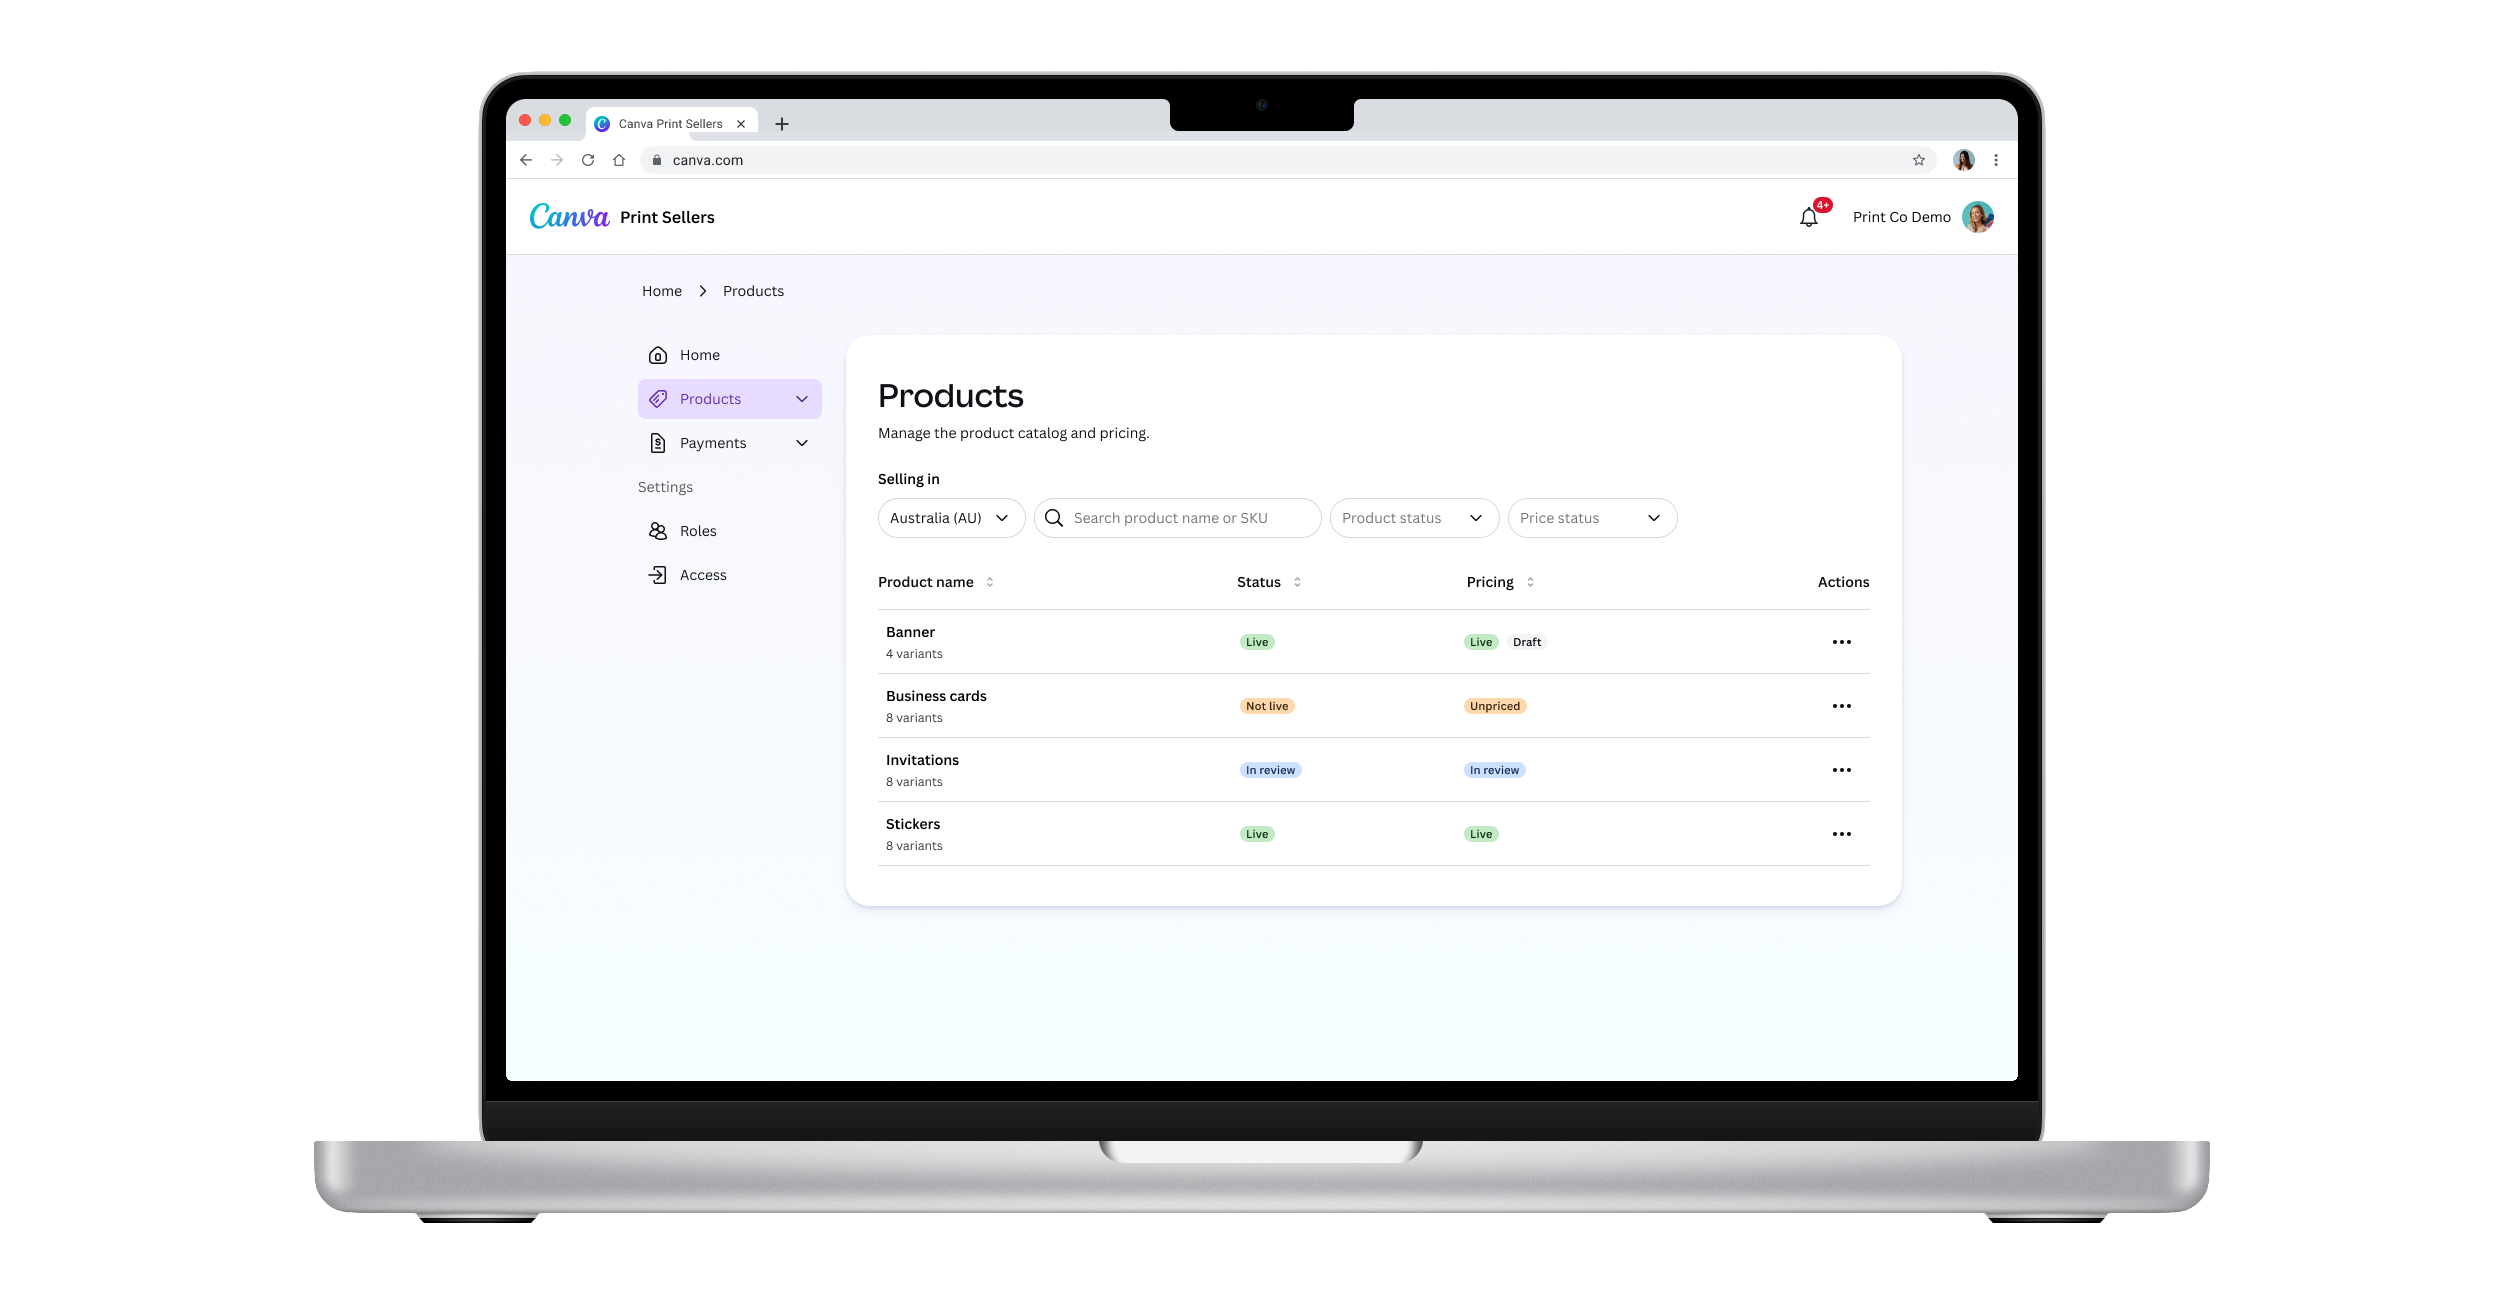
As Lead Product Designer, I set the design strategy and shipped a seller portal (products, pricing, payments, refunds), an admin view for managing merchants, and a ticketing system for Print Operations, all on deadline, working with Legal, Finance, Tax, CX, Print Operations, Engineering and Print leadership.
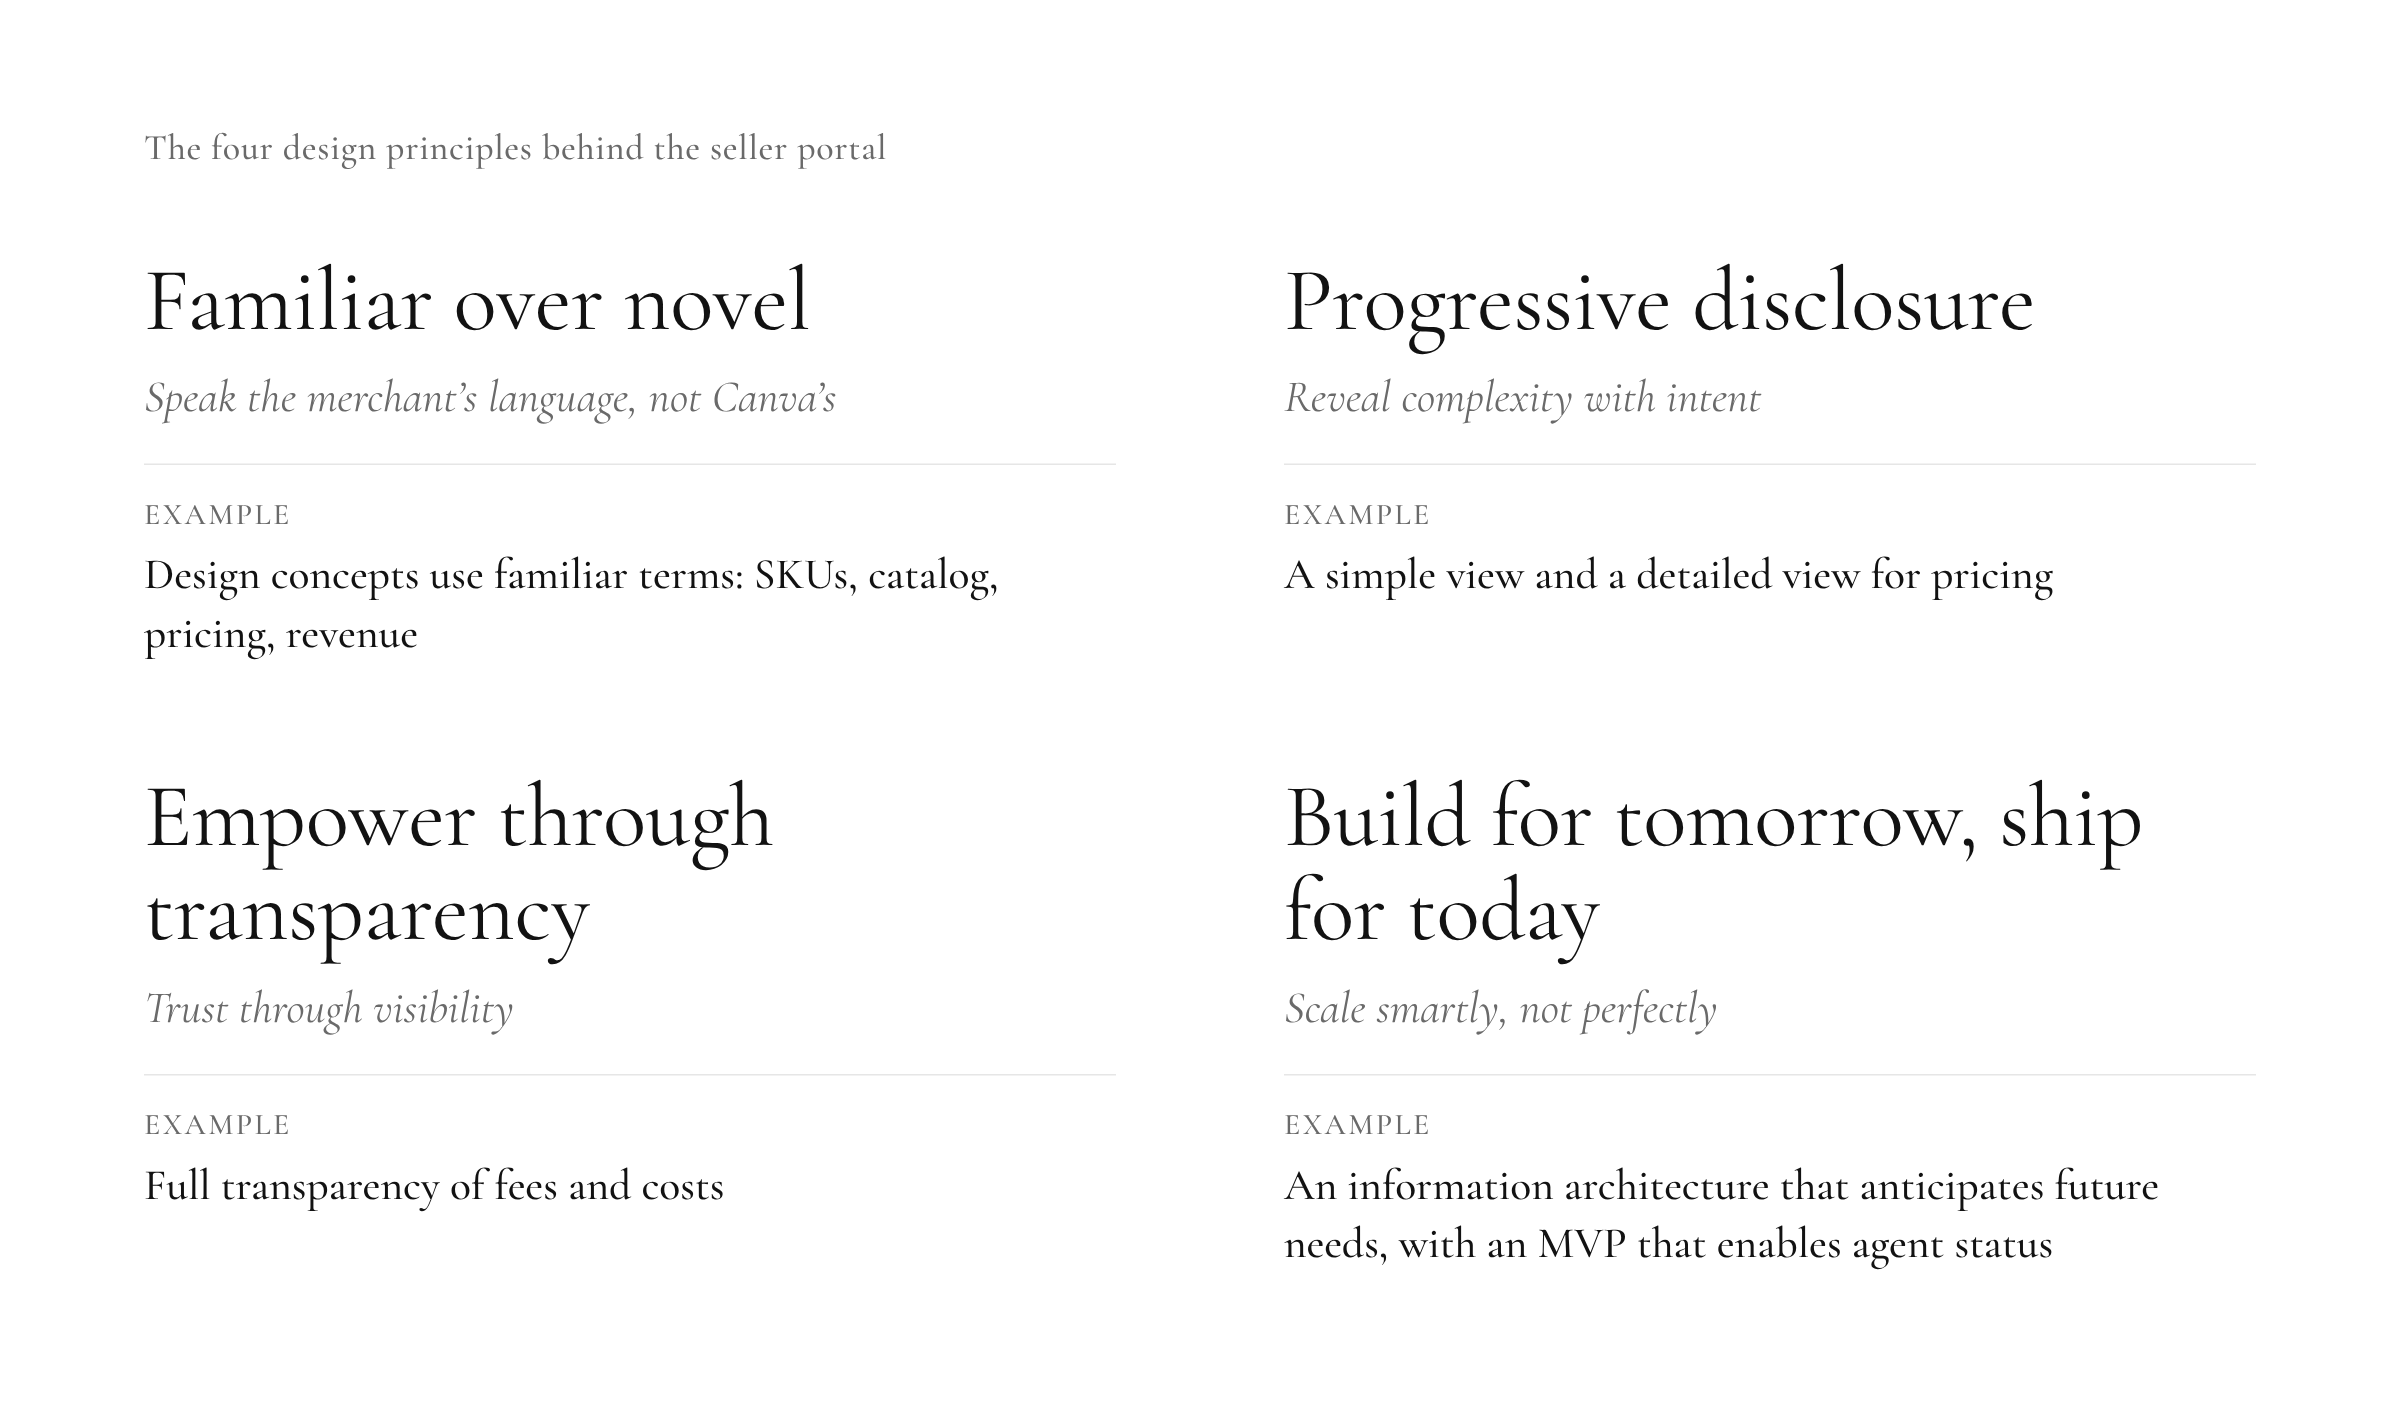
The strategy rested on four principles: familiar over novel, progressive disclosure, empower through transparency, and build for tomorrow, ship for today. Two of them shaped the hardest decisions below.
Balancing Legal, seller brands and Canva’s own in the pilot
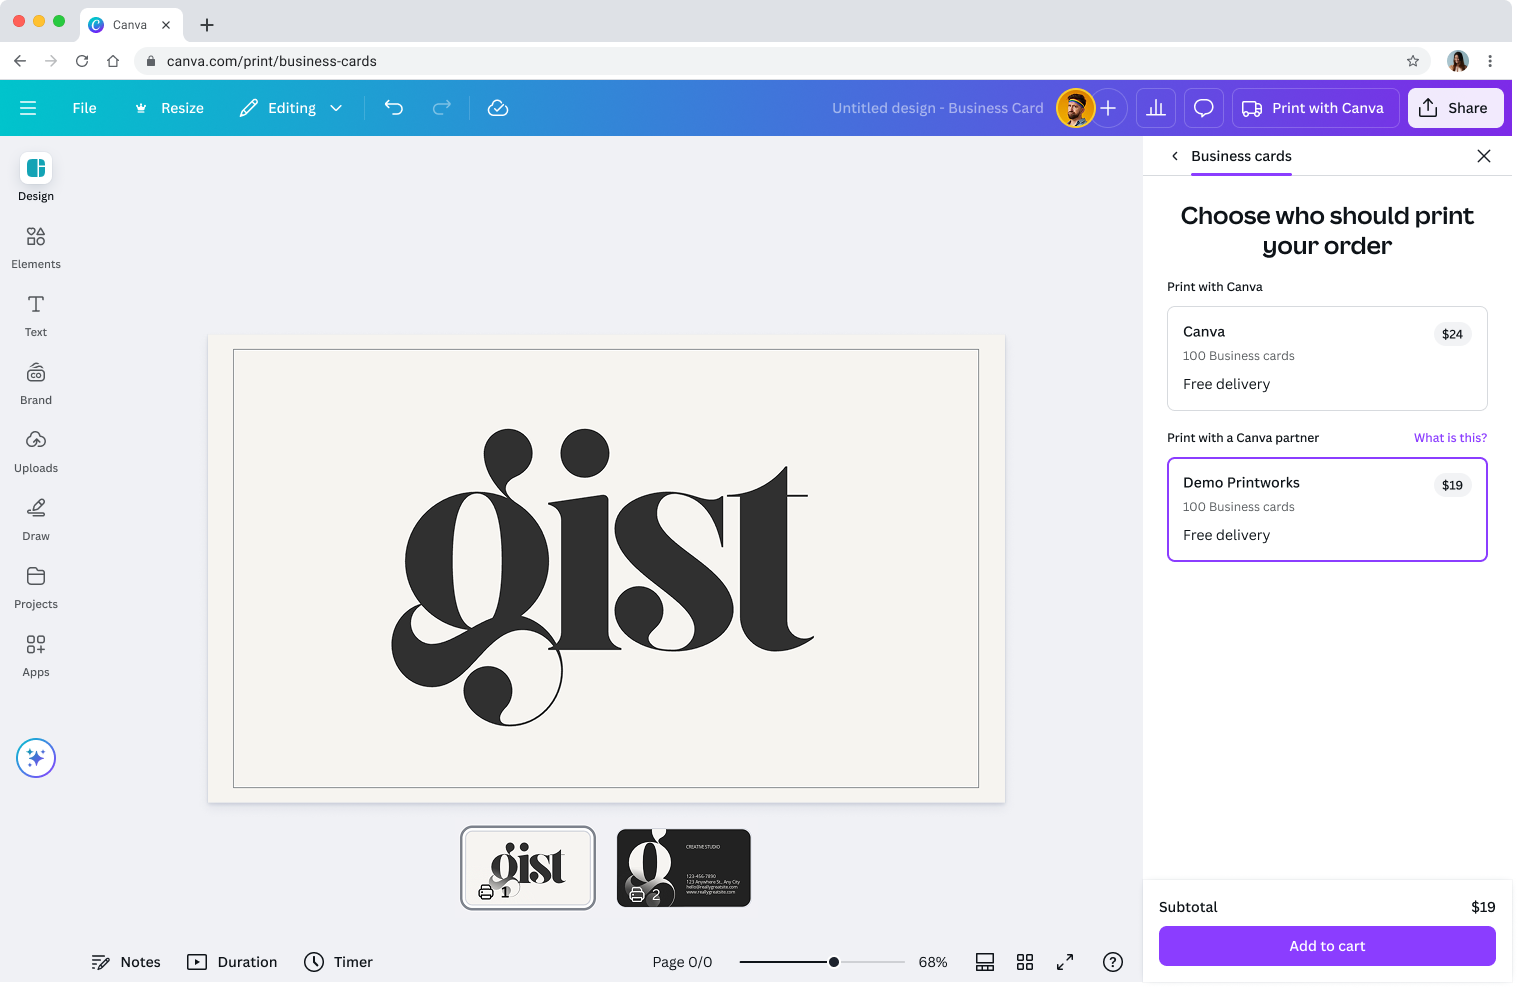
The pilot was Canva’s first time letting customers choose a printer, and I led the design. Legal wanted banners and links on every surface of the print journey so the reason for the choice could be explained at any moment.
I argued for a contextual approach instead: front-load the journey with the banner and link, then reduce the information as the customer progresses. Because it was a pilot, Legal agreed to take a risk-based approach and treat it as a learning opportunity.
A second tension surfaced while onboarding a new seller: how their branding should appear across the print journey. Sellers want their brand clear and visible, while Canva needs to stay the primary brand on its own site. Nothing existing settled this, and to avoid ad-hoc debates and design changes, I wrote a Seller brand strategy with contributions from designers across Print. It became a guide for working by design, not by request.
Before designing anything, I collaborated with the product manager on a decision doc comparing three ways to show partner choice: in the print configuration step, in a new step after the proof, or by sending customers to the partner’s own checkout. The configuration step was already crowded and hid the choice. The external checkout gave up control of the flow and broke multi-item orders. The step after the proof added friction, but it had room to explain price, speed and brand, and it was the best way to learn, so that’s what we recommended, with experiments on which partner to default to.
Usability testing also changed my mind. It killed my first idea, a “marketplace” badge on seller options, so I designed a seller selection panel: an explicit choice in the flow.
Leadership then couldn’t agree on how obvious the choice should be, so rather than settle it by opinion, we tested it: a selection panel or a subtle link, each defaulting to either the seller or Canva, giving four variants plus a control.
The results were small and directional. The subtle link defaulting to Canva converted best; the panel defaulting to Canva also performed well but hurt average order value. The customer-facing marketplace work then moved to another team, and mine focused on reaching legally compliant agent status.
Why I held the line on Draft mode when leadership asked for simpler
To reach agent status, sellers needed a self-serve place to manage their products, prices and payments. I first got Print Supergroup leadership (Head of Product, Design Lead, Engineering Lead) behind the strategy, then ran a card sort with Print Operations, PMs and designers to shape the IA.
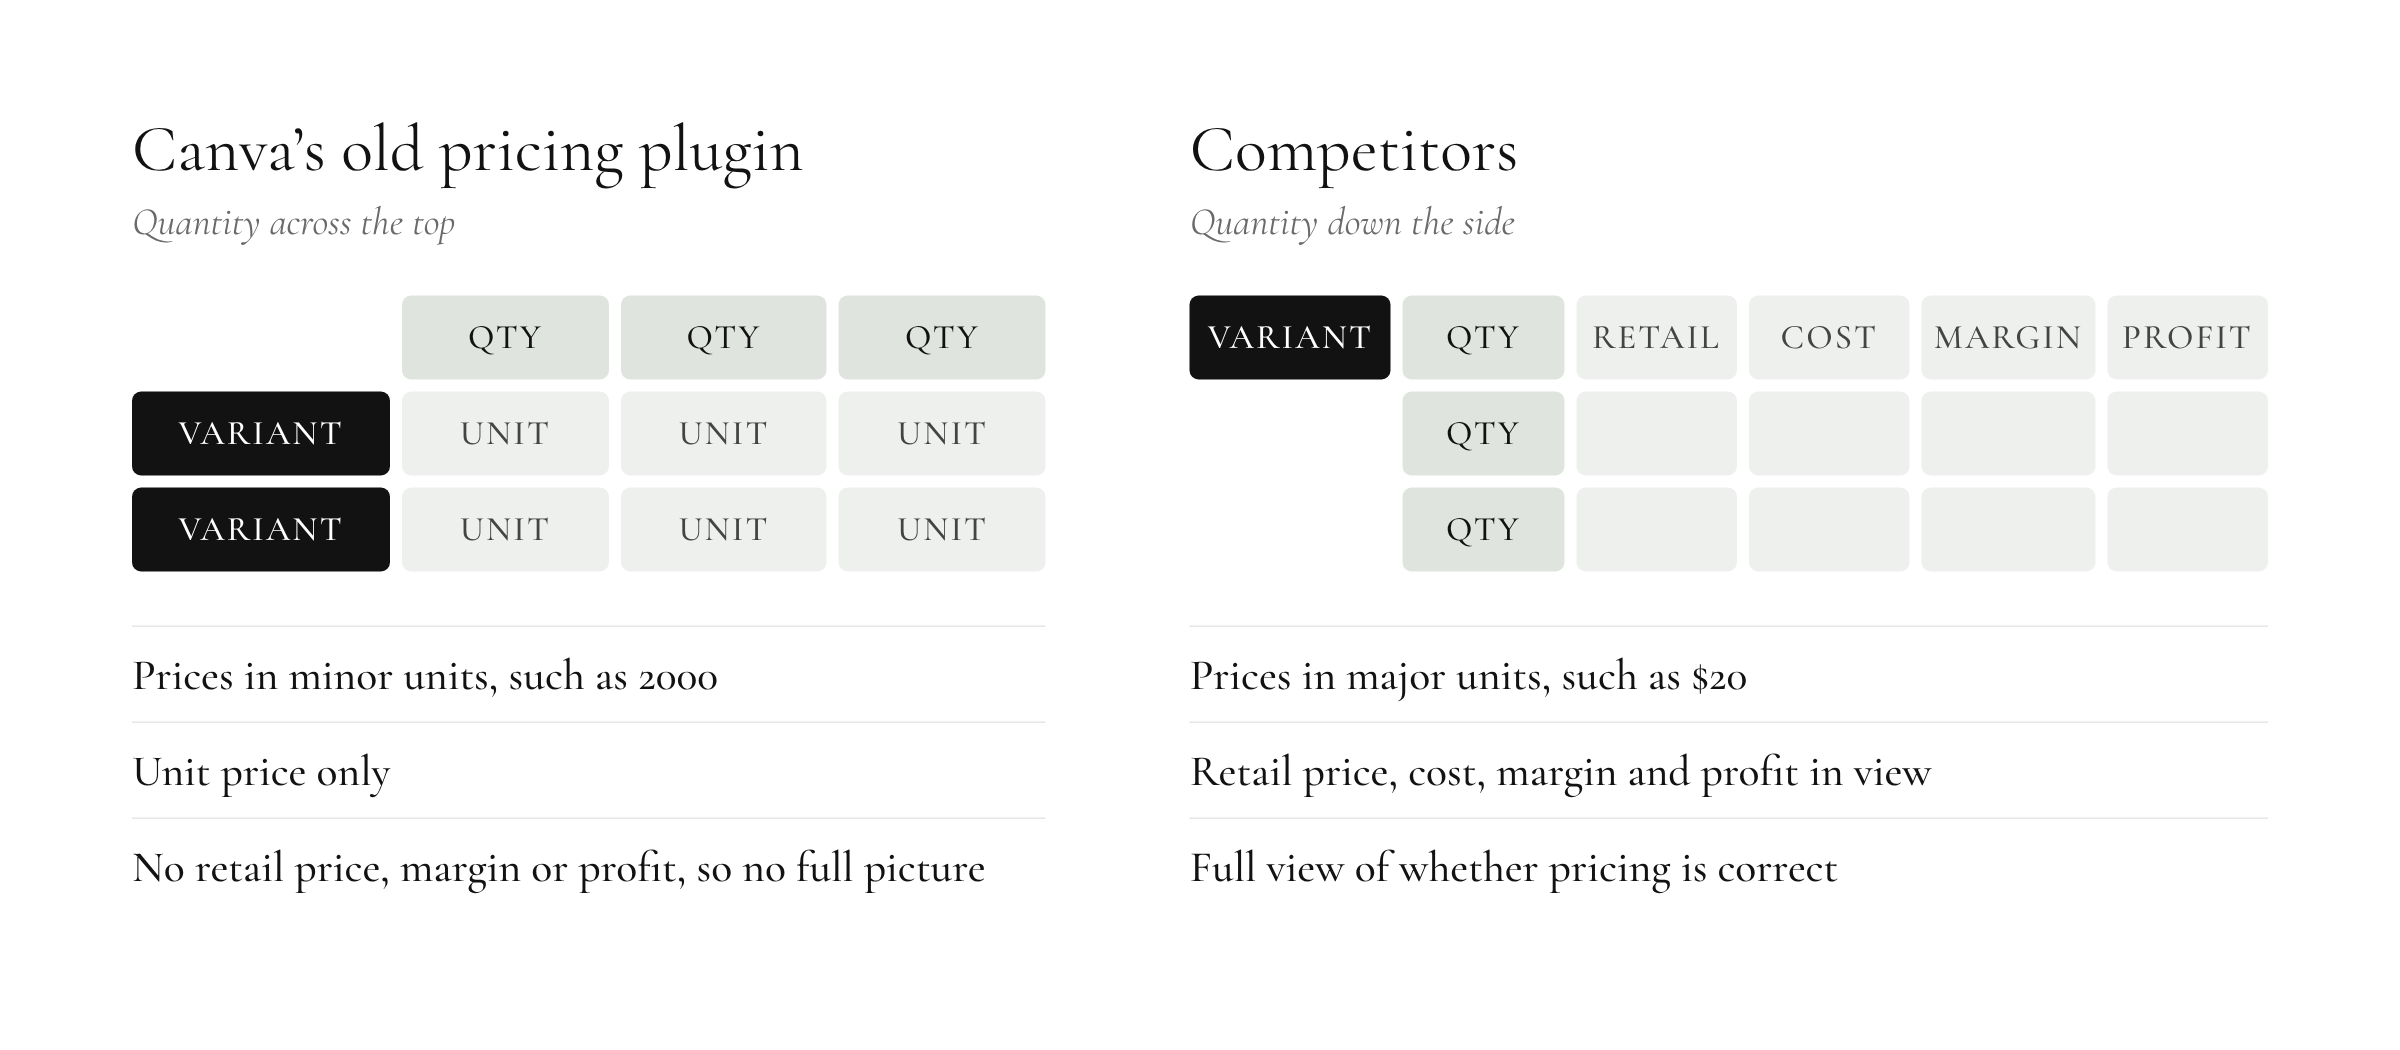
Pricing was the hardest problem. Canva prices by quantity bands, which most seller platforms don’t: a seller with 10 products, 5 variants each and 6 bands has 300 prices to manage. I collaborated with Print Operations and engineering to learn how variants, SKUs and bands nest. The old pricing plugin had no decimals, so $23.00 appeared as 2300. That was hard to read at a glance and easy to get wrong by a factor of ten, and mistakes like it had cost Canva money, including a product that went live at a 94% discount. I changed price entry to real values and pushed for the backend change, and it landed.
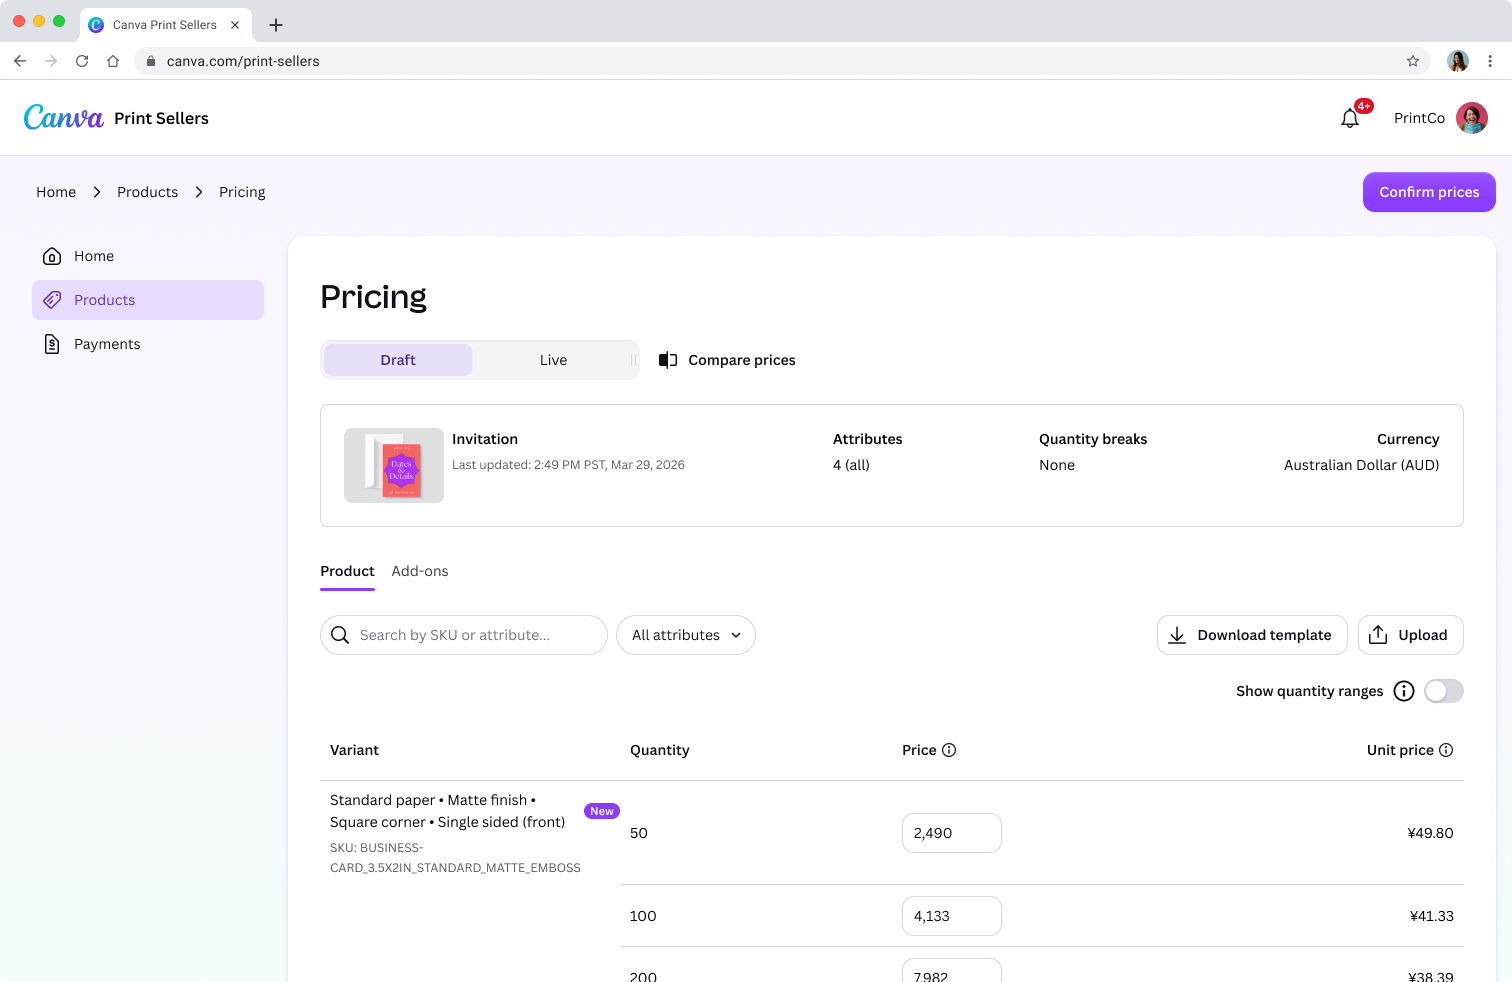
The people entering prices were Print Ops specialists at print businesses, closer to e-commerce operations managers than typical Canva users, and they already managed prices in spreadsheets. A competitor review showed others put quantity down the side, used whole-dollar prices and showed retail price, cost and margin. I moved quantity to the vertical axis, made CSV upload the main way to add prices, and added a preview of the retail price customers would see. Where decimal pricing doesn’t exist, sellers now enter a total price instead of a unit price. That total is the retail price, so the preview isn’t needed there.
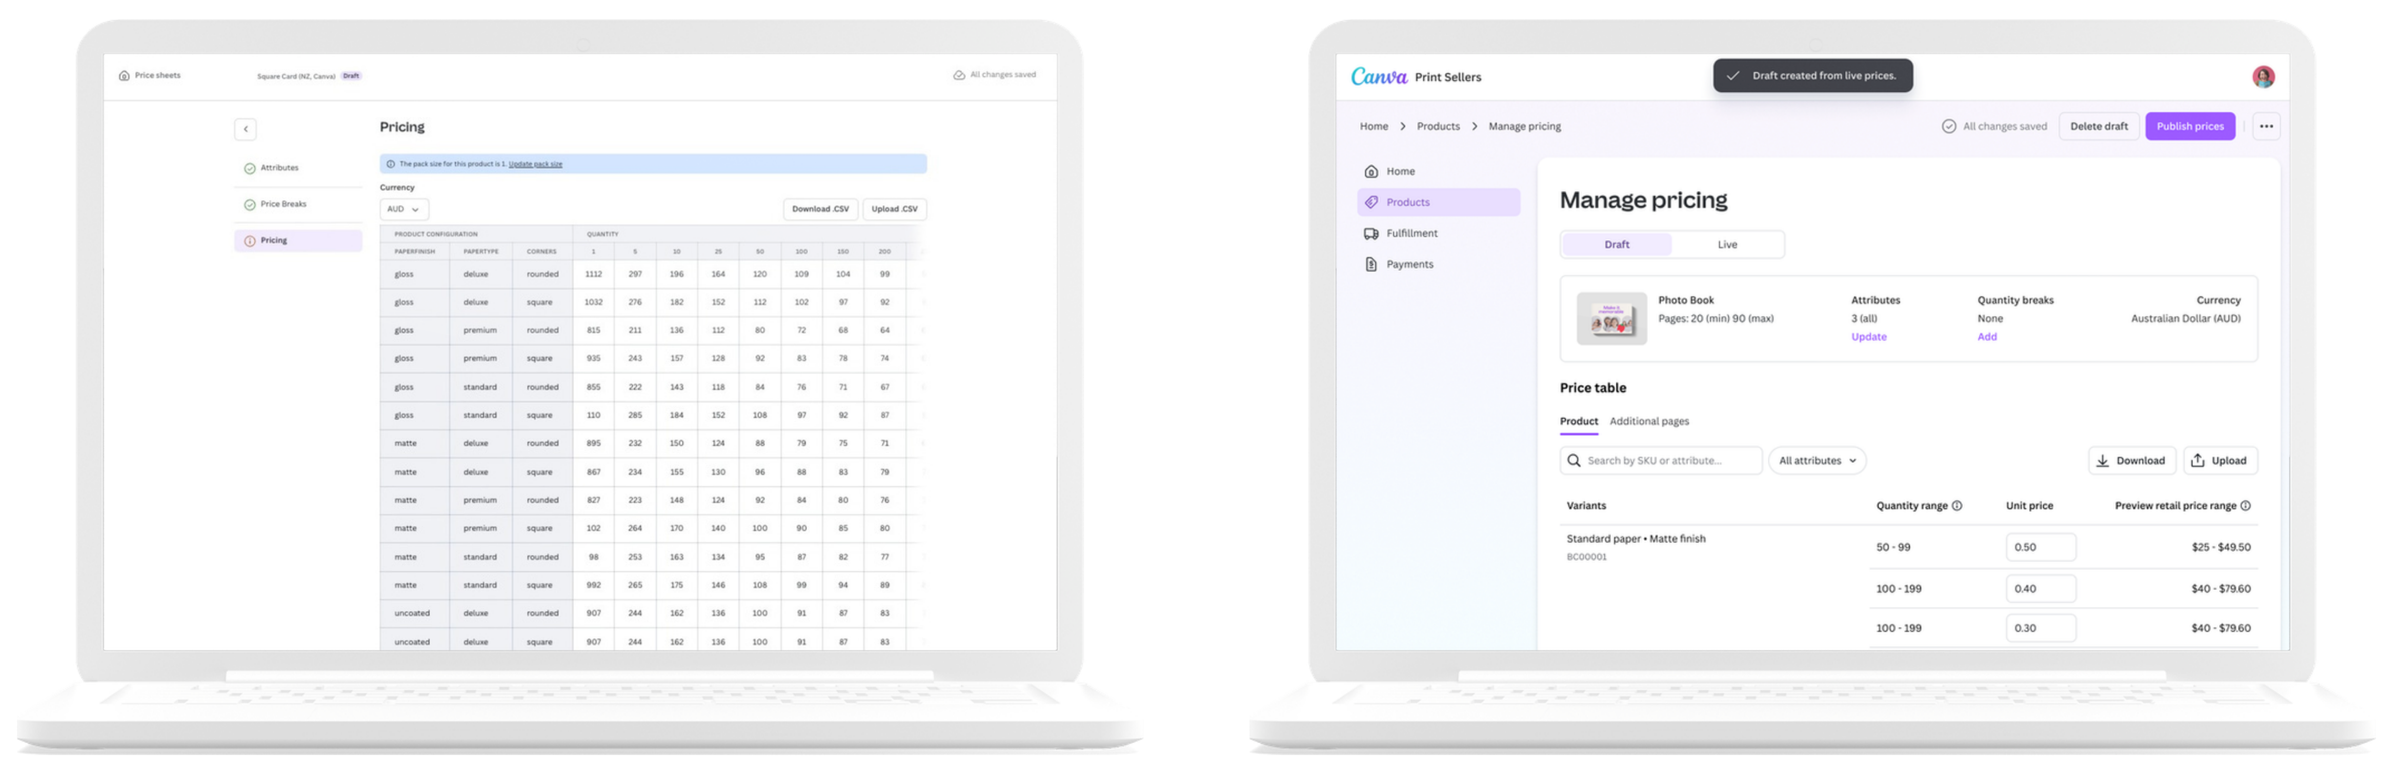
I also said no to several ideas. Copying prices between variants had no evidence behind it, and sellers add most prices by CSV. A base price plus premiums breaks because prices change across quantity bands. Treating the table like a spreadsheet didn’t fit, because only one price is editable. I left margins and costs for later, since we didn’t know what sellers’ costs were or whether they would share them.
When Print leadership asked why Draft and Live couldn’t be simpler, I built the case around the context: hundreds of SKUs, several bands per variant, and sellers new to marketplace pricing, where one irreversible error (say, a 94% discount accidentally published) is costly. Draft mode adds guard rails, can be worked on across sessions, and matches how Print Operations compares live prices against new ones. I stress-tested the argument with Claude, asking it to attack my reasoning from leadership’s view, which changed what I led with.
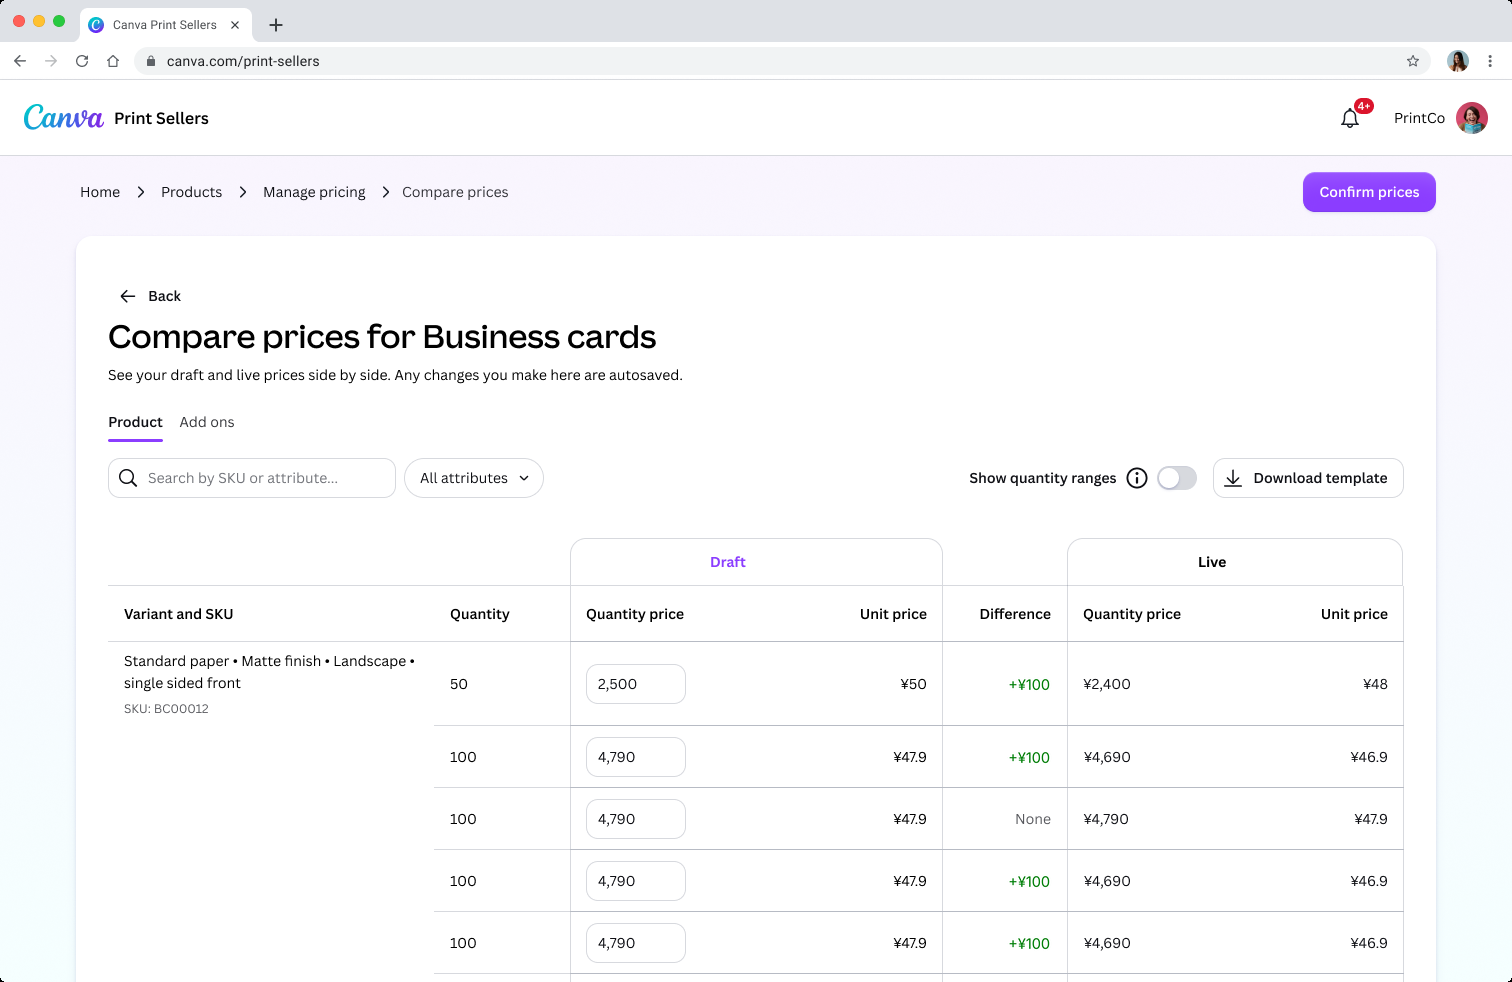
We agreed to revisit comparison after the MVP. The team’s feedback was that comparing reduces errors, so after speaking with one of the people who set prices, I designed a “Compare prices” view, whose difference column shows the live impact of a change as the seller makes it.
Building payout numbers sellers can trust
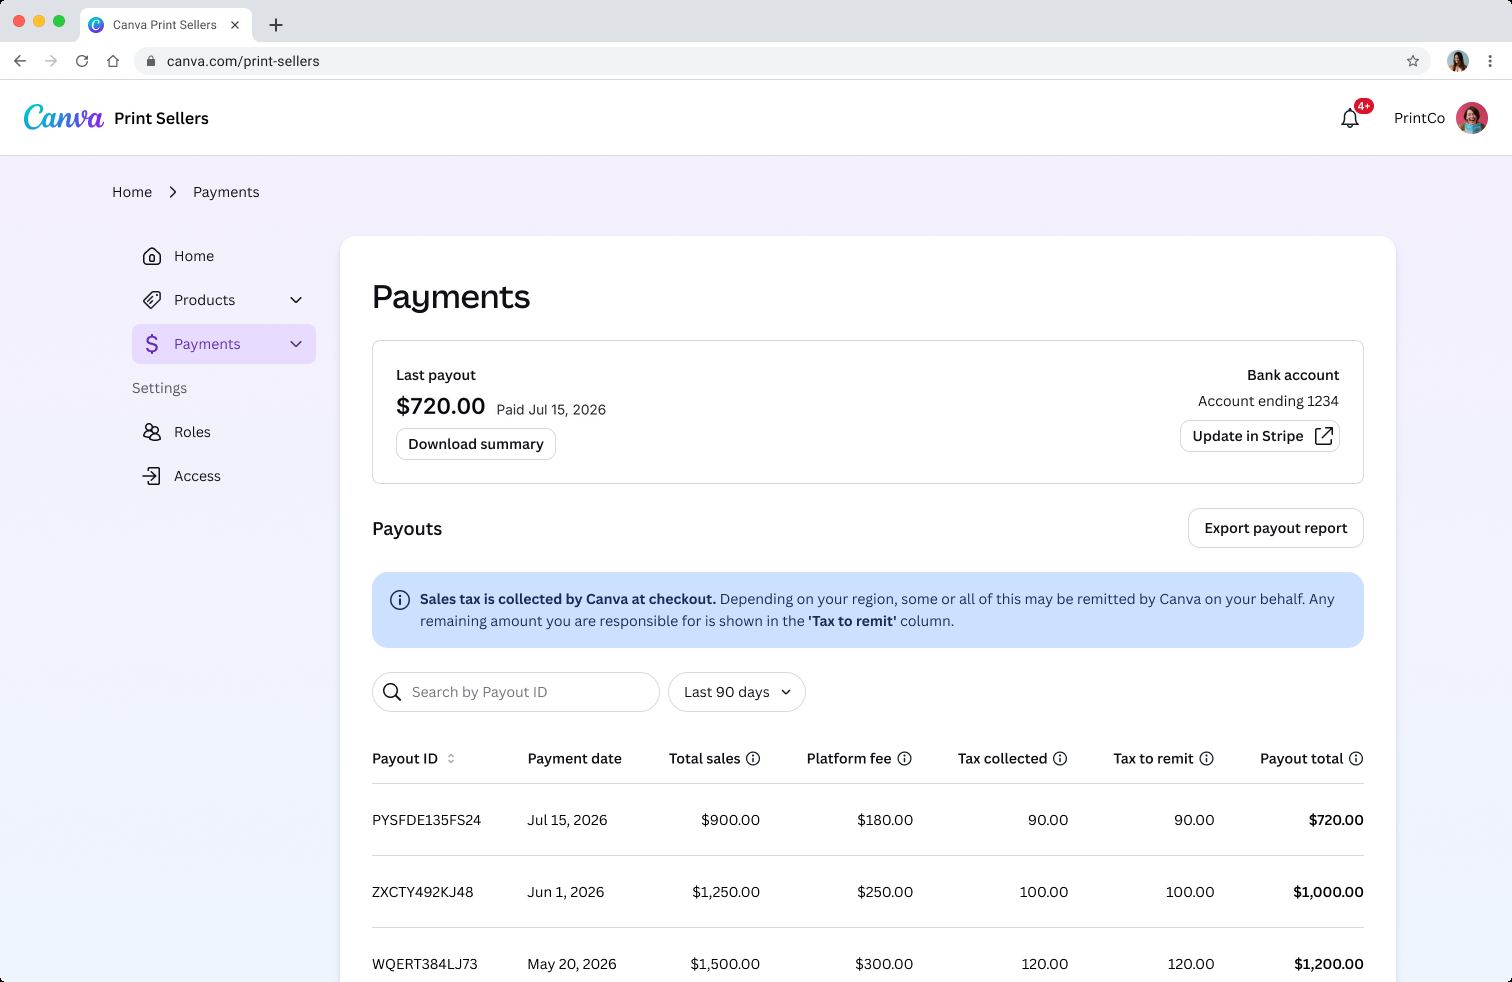
Sellers had to trust that we’d calculated their payments correctly. This was the strategy’s “empower through transparency” principle in practice: merchants should always understand what’s happening with their orders and payments, and when Canva takes action, we explain why in clear terms. Three decisions shaped the work.
Showing “last payout” instead of “upcoming payout.” My first design showed the upcoming payout date, but Stripe’s payout cadence would be irregular and unpredictable. I changed it to the last payout: a known value that builds confidence and supports reconciliation.
Designing within a CSV constraint. I worked with Finance and Tax on a CSV export of invoice and payout data. Engineering could only build CSV for the MVP, not a multi-tab spreadsheet that would have read more easily, so I designed within that limit, using Claude to get a first draft quickly.
Splitting the reports twice. Tax rules differ by jurisdiction (the seller remits in some, Canva in others), so I separated them to avoid irrelevant columns. Then Finance and the Head of Tax struggled to read a single report covering payouts, invoices, orders and items, so I split it into Payouts and Invoices. Feedback was positive, and it aligned us on correct financial terminology.
A “How to read your reports” guide, and a review of the Payments page tooltips, kept the terms consistent across the experience.

Winning support for a ticketing system, and keeping its scope achievable
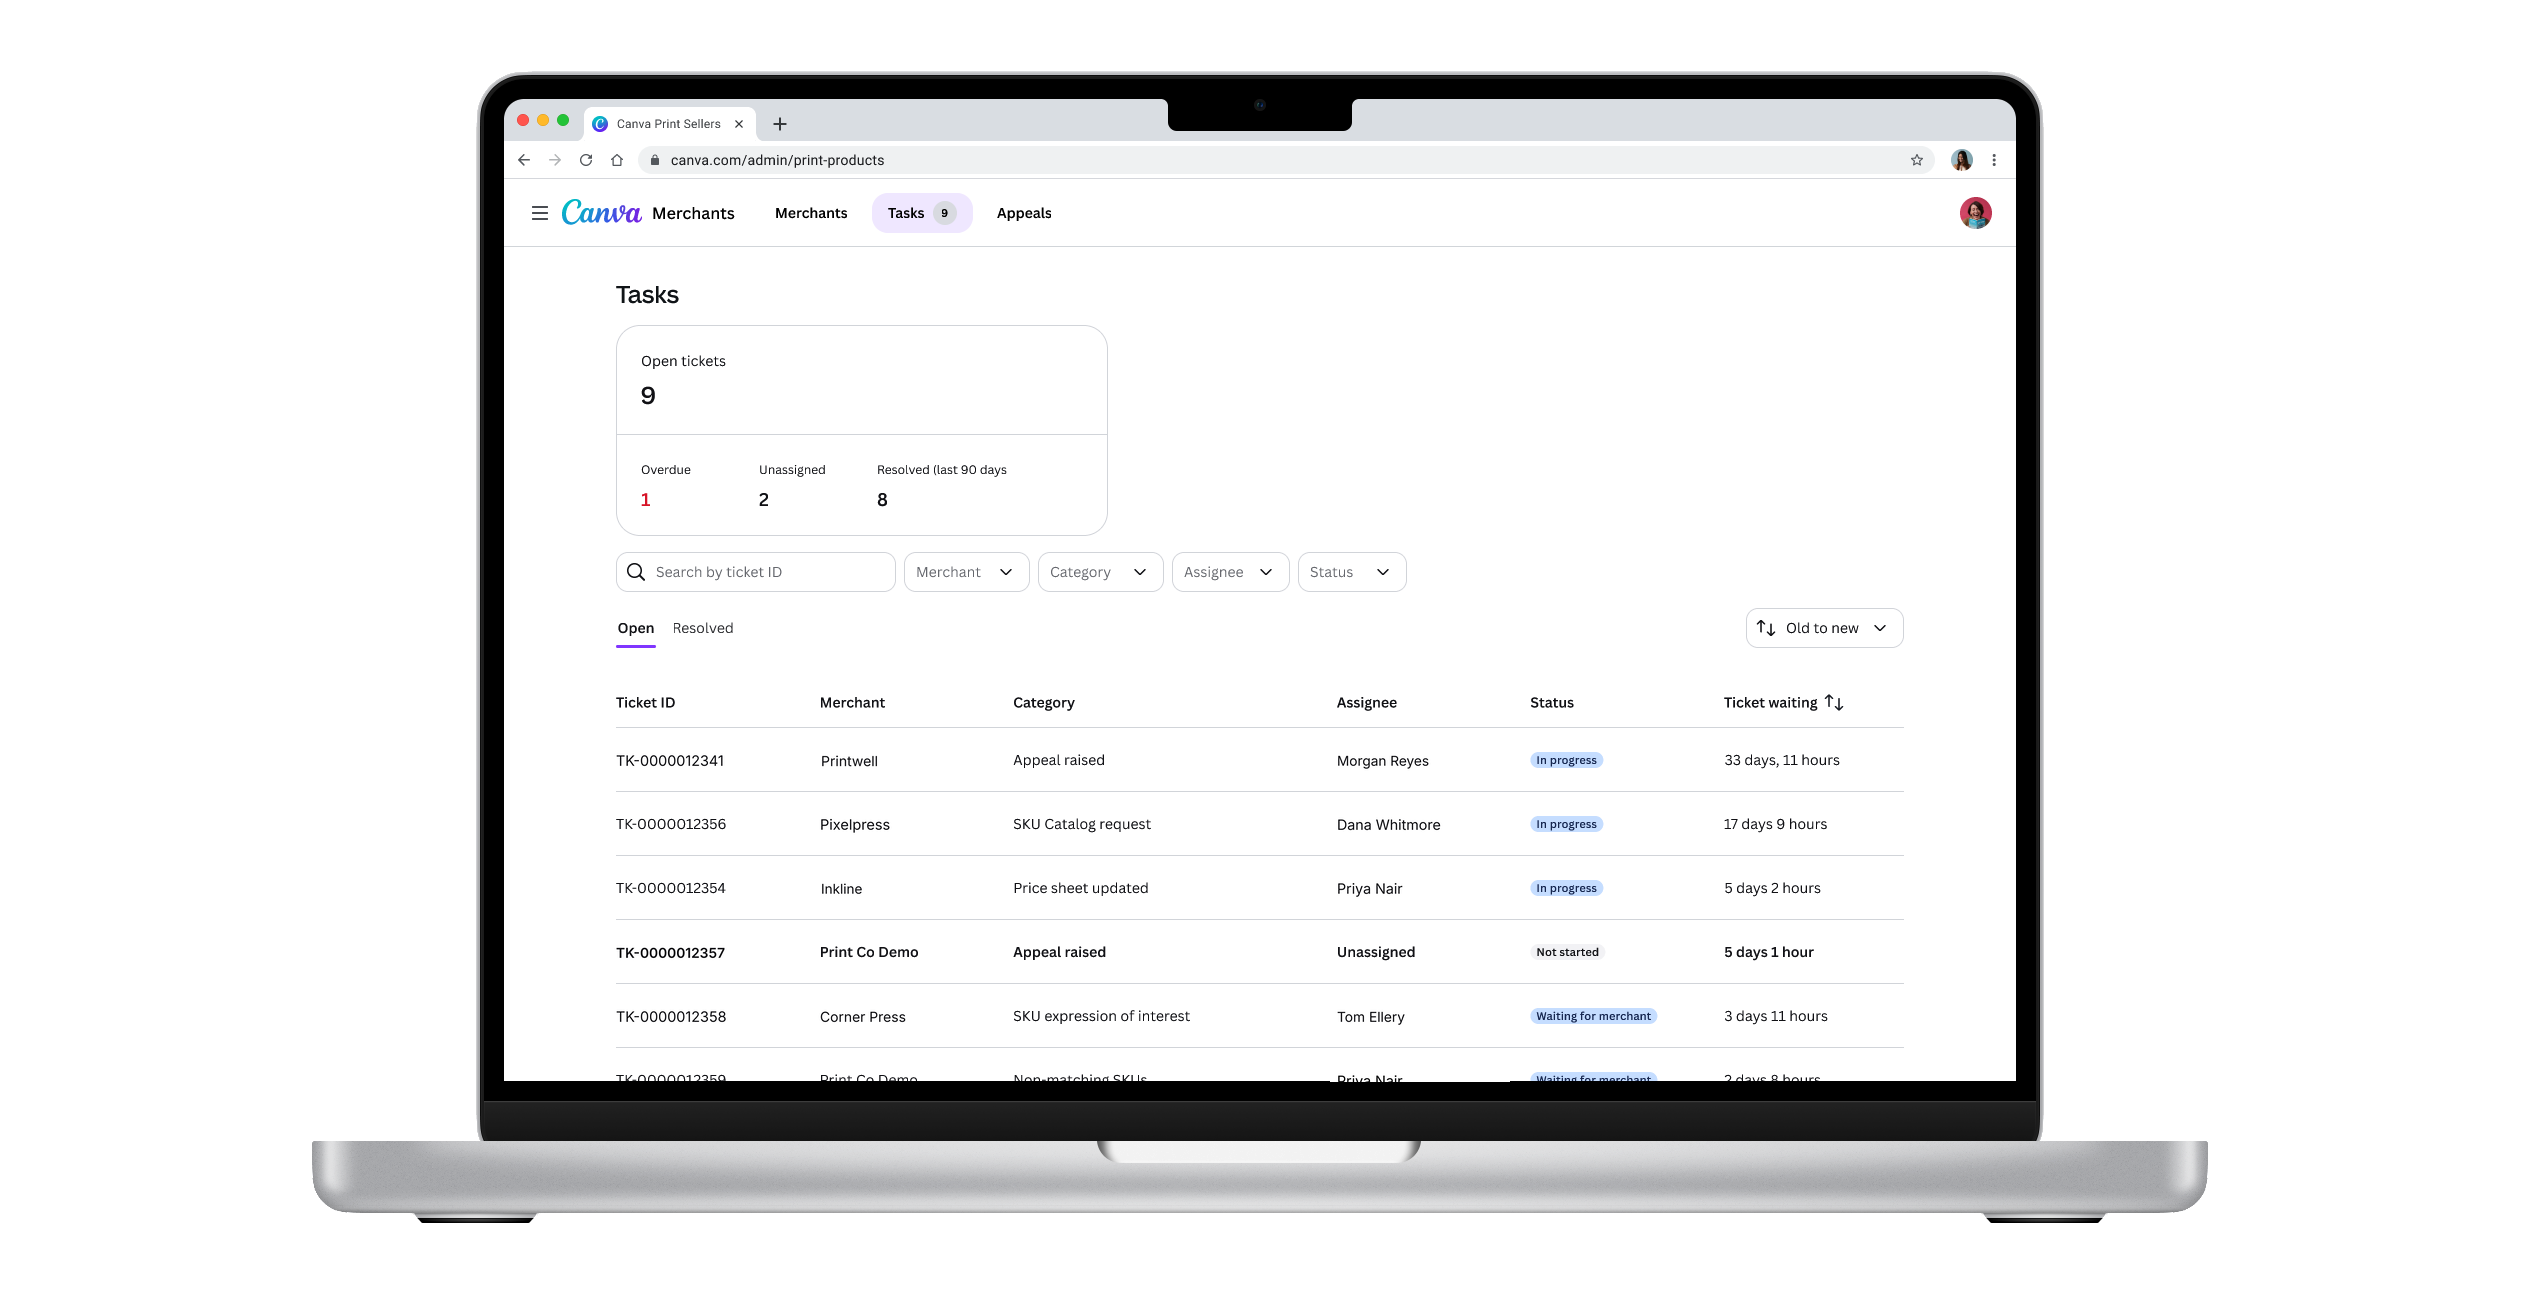
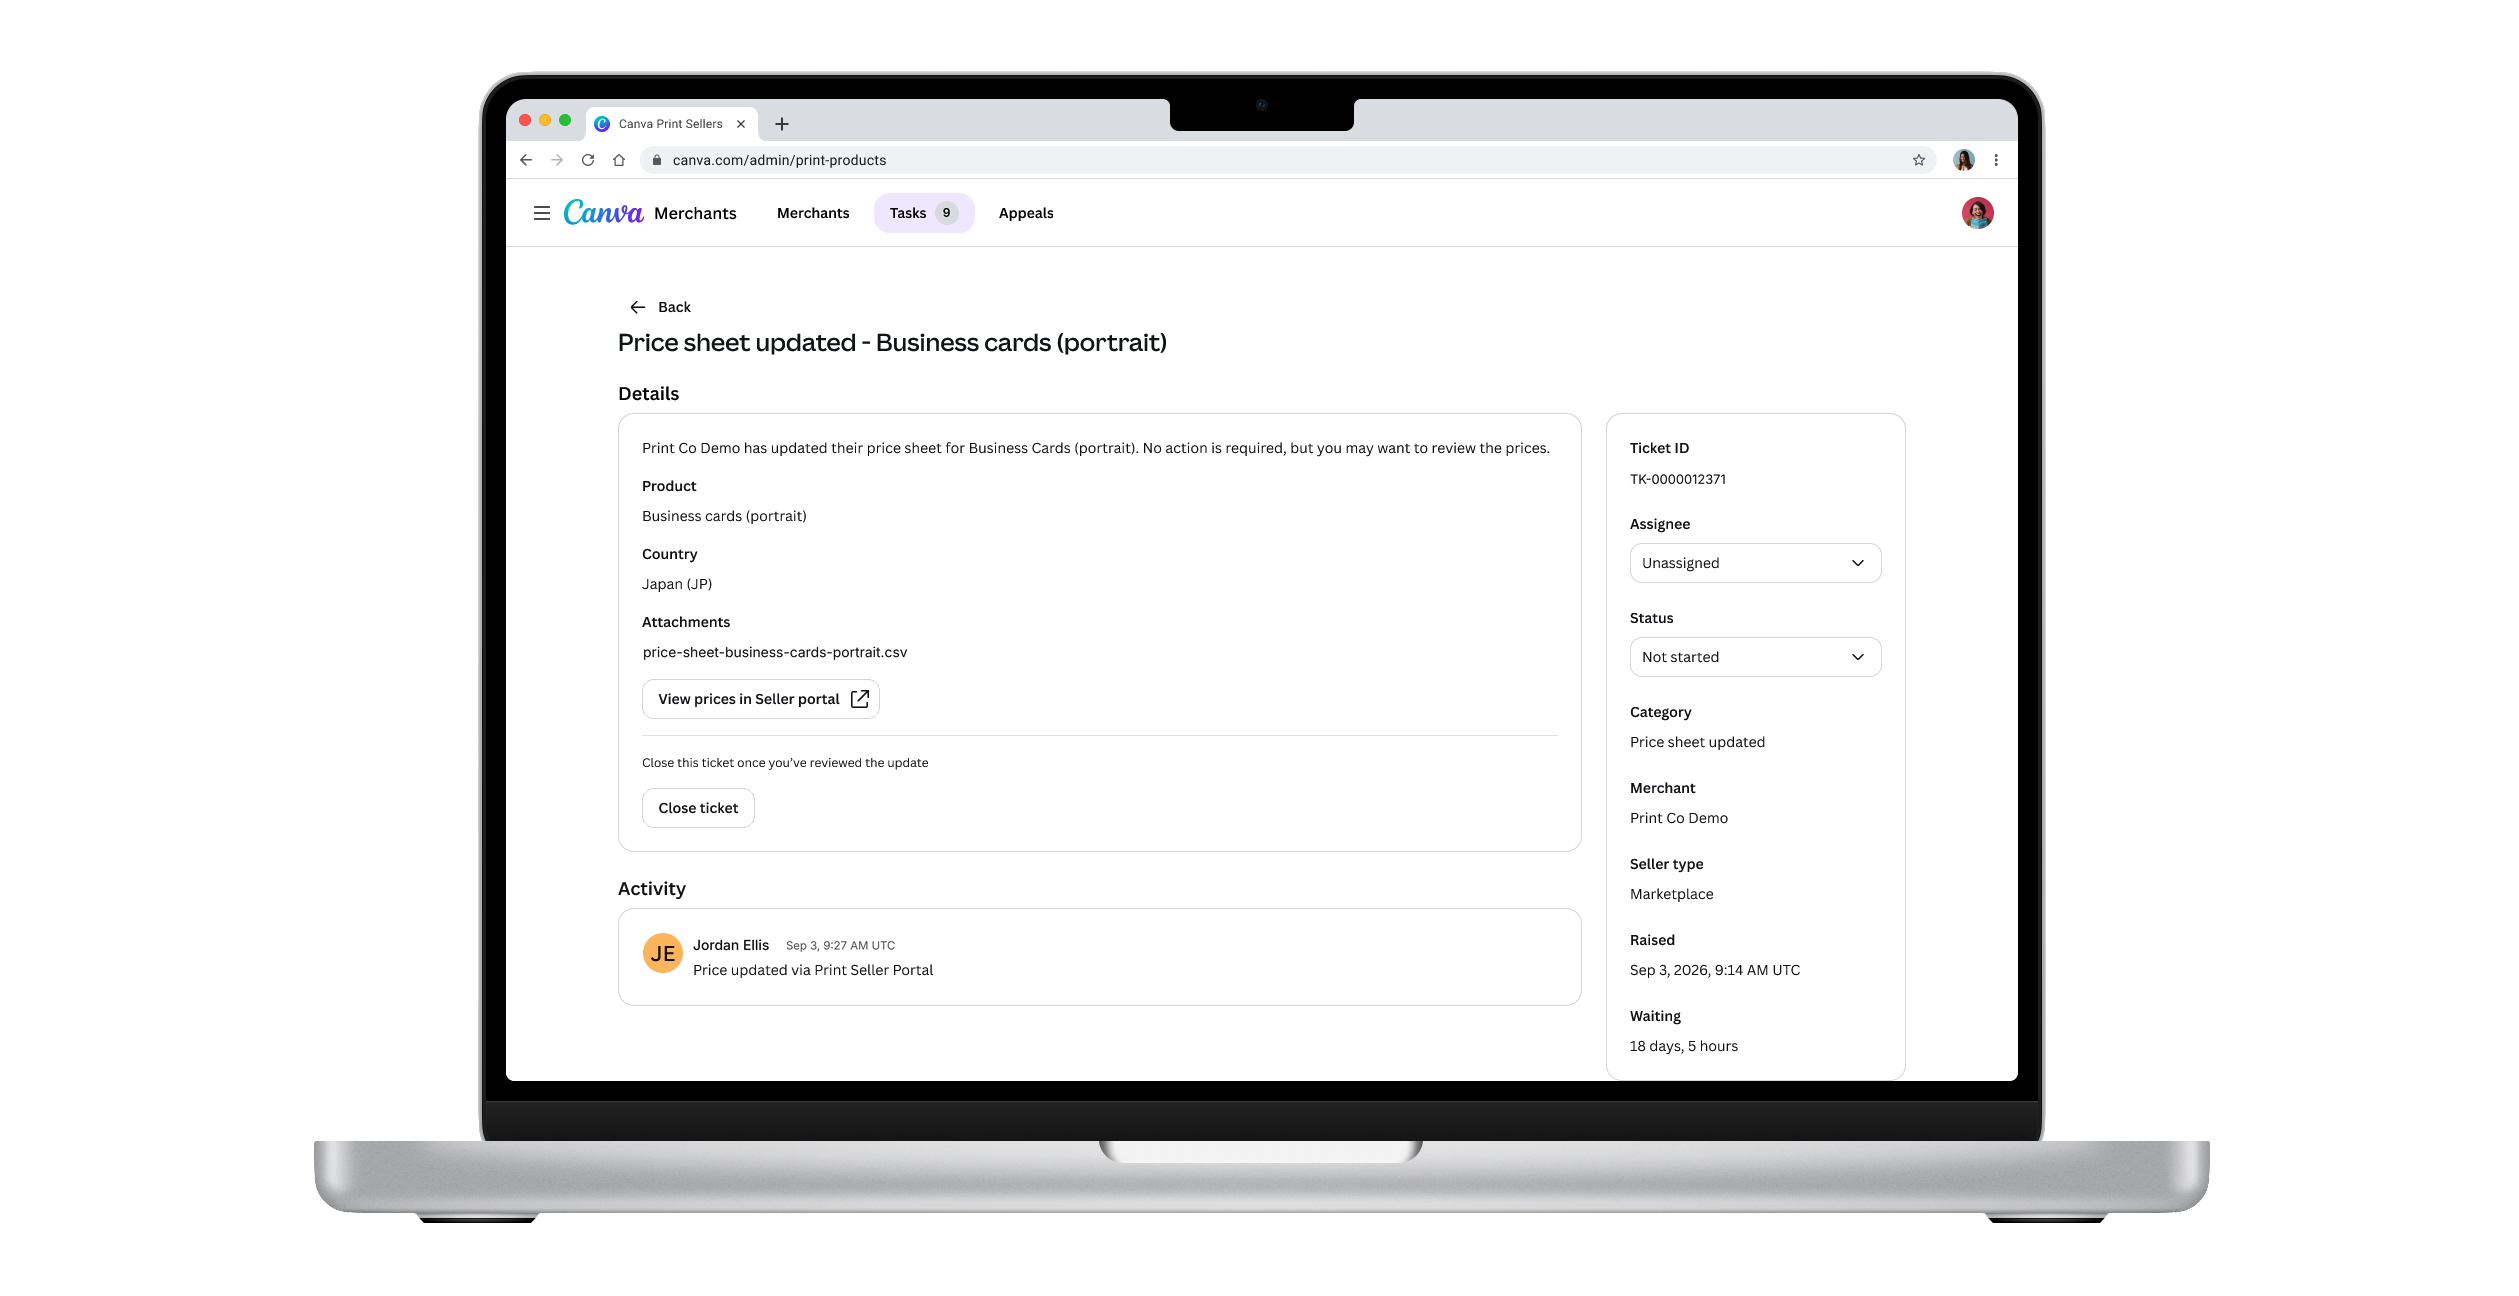
As the portal grew, I saw that Print Operations needed one place to manage incoming requests. I wrote a 1-pager outlining the problem and options, got buy-in from Operations and my triad, and after workshopping with engineering we decided to build a simple ticketing system.
Print Operations wanted a lot in the MVP, so my job was to manage expectations and keep scope achievable. I captured every requirement as a Jira ticket in the backlog, so nothing was lost even if it missed the first release, which got scope approved quickly and unblocked engineering. It’s the strategy’s “build for tomorrow, ship for today” principle: the IA anticipates future needs, but the MVP only includes what enables agent status.
Also shipped: the admin portal, the appeals flow, and a faster way to prototype
- Admin portal for Print Operations. It was built inside the existing Print Admin Portal, so IA and components were constrained. I worked directly with the Principal backend engineer on Figma designs for build, and gave UI feedback on staging through marked-up screenshots. For choosing the hundreds of variants a seller may sell, a checklist failed in a team session, so I moved to a structured table that grouped variants and made selection errors harder.
- Designing the handoff explicitly. Print Operations got no automatic notification when a seller finished pricing. Rather than leave the gap invisible, I worked with engineering on a dialog at the end of the pricing flow that opens a pre-addressed email with a template. It wasn’t automation, but it was an honest bridge for the MVP.
- A two-sided appeals flow. For compliance, sellers had to see customer refunds and reprints on orders they’d fulfilled, with the chance to appeal. I designed it across the seller and admin portals. Engineering were reluctant to add scope, so I advocated for order details and thumbnails for sellers, and a link to the original complaint ticket for Operations, rather than duplicating data.
- Faster prototyping with Flying Fox. I moved from Cursor to Canva’s internal Flying Fox tool, which uses the Easel design system. Edge cases surfaced sooner, and on the Roles page I updated interaction patterns live in weekly syncs, so everyone left with a shared understanding and an artefact to build from.
The outcome: a compliant marketplace, delivered on time
This programme was never about moving a conversion metric. Its goal was to build the tools Marketplace needed to operate legally, and we delivered them on time. The portal is also built to bring all pricing into one place, instead of sellers managing prices in one tool and Print Operations in another, and it lays the foundation for later work like seller-added products and self-serve catalog management.
Adoption is still early. The first marketplace seller is using the portal, and Print Operations uses it to manage other sellers, so the evidence so far is qualitative. Legal agreed to a risk-based approach to disclosure, Finance and Tax gave positive feedback once the reports were reworked, and Print Operations signed off on a scope that engineering could deliver.
What I’d do differently
Getting direct user input was the hardest part. Our first seller was in Japan, so there was a language barrier, and because sellers and contracts are sensitive, I used Print Operations as a proxy. With Operations spread across Manila, Sydney and the US, I defaulted to async feedback, which worked but was slow. Next time I’d set a weekly 30-minute session from the start.
The build also exposed gaps where something wasn’t fully defined and engineers, sometimes using AI tools, filled it in differently from my intent. I ran a ways-of-working retro with the front-end engineers, and my commitment was to build prototypes of end-to-end flows before engineering starts, so ambiguity has less room to live. I’d also involve engineers earlier on UI implications, since several constraints (Print Operations review scope, backend date logic, payout cadence) landed mid-design.